Welcome to Life Images by Jill

Welcome to Life Images by Jill.........Stepping into the light and bringing together the images and stories of our world. I am a photographer, writer and multi-media artist.
Focussing mainly on Western Australia and Australia, I am seeking to preserve images and memories of the beautiful world in which we live and the people in it.

Welcome!

Welcome!
PLEASE CLICK ON THE IMAGE TO GO TO MY RED BUBBLE STORE.

Friday, 11 August 2023

The wildflowers are blooming in the Western Australian Kimberley north west region

We might feel like we are in the depths of winter here in the South West of Western Australia, but it is wildflower time. Followers to my blog might know that photographing wildflowers is a passion of mine, so this is my favourite time of year. Usually I have to wait till September to get out and about taking photos of wildflowers, but I was lucky that my wildflower experience started in late June this year when we travelled north to the Kimberley during the north-west's warm and sunny winter dry season.


I am particularly lucky in Western Australia in that we have up to 12,000 known species of wildflowers including eight bio-diversity hotspots. The flowering period spreads over several months starting from July in the north till November in the south. However you will always find something flowering in the Western Australia bush somewhere.  

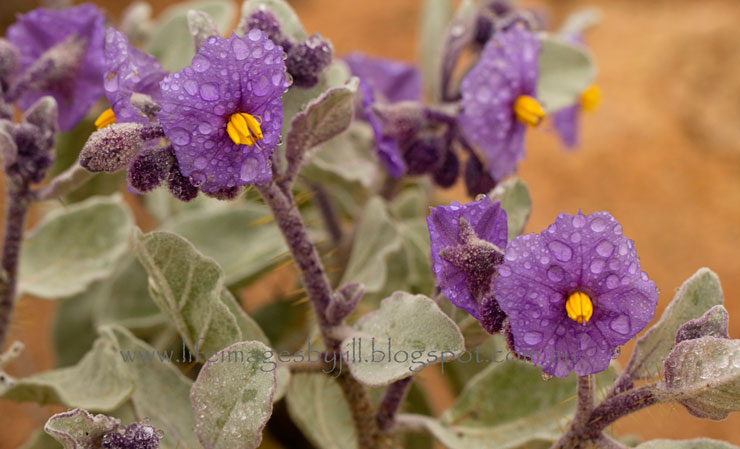
Our wildflower experience started on the first day of our trip at The Granites just north of Mount Magnet on the Great Northern Highway. Despite the rain I was out photographing this prickly character, the Flannel Bush - Solanum lasiophyllum.
  
 
From Broome we travelled north up the dirt Broome to Cape Leveque Road to go camping with friends. It was up in this region, the Dampier Peninsular, that we came across the Splendid Batchelors Buttons - Gomphrena canescens. You can see them also at the beginning of my post. I love them singularly and on mass.

 
If you saw one of my previous posts - The Boab Tree - about the Kimberley's iconic tree, the Boab - Adansonia gregorii - you would have seen this photo of the Boab flower. If not, you can click on the link to check out my post.  I had never seen a Boab flower before, but a few trees were flowering in Broome.


One of my favourites since our first trip north 30 years ago - the Mulla Mulla - Ptilotus. Widespread in arid and semi-arid areas, there are about 100 species in the genus Ptilotus, all but one occurring only in Australia. Here photographed backlit at Purnululu. Cathedral Gorge, Purnululu


You will see the bright yellow flowers of the Kapok Bush - Cochlospermum fraseri - flowering from April to September throughout the Kimberley, particular in rocky sandstone areas. The large scented flowers are up to seven centimetres in diameter, and the swollen green fruits burst open to release silky seeds. It was the first time I had ever seen the inside of the fruit, see below, which we found on the hill overlooking beautiful Marglu Billabong south of Wyndham. 


The beautiful water lillies of Marglu Billabong. There is a bird-hide here. I've borrowed the two bird pics from my husband. The one on the left is a Brolga - Grus rubicunda - which is found across tropical northern Australia as well as southwards to north and east central regions, inhabiting large open wetlands, grassy plains, coastal mudflats and irrigated croplands. There courtship dance involves an elaborate dance. You can find out more here - Birdlife Australia.

Another birding site for Wyndham - Birding WA


And yes in the second picture can you see a crocodile in the background behind the White Egret. This is a salt-water crocodile. Yes, they do eat people, so definitely one you don't want to get near, and the reason why the bird-hide is enclosed in heavy-duty wire mesh. In case you can't see that croc....


Back to wildflowers...

Below is the Sticky Kurrajong - Brachychiton viscidulus - also known as the Kimberley Rose, or by the Aboroginal names darlab or djalad. We saw many of these along the Gibb River Road and also at Mt Elizabeth Station. Flowering from April to December the spectacular red flowers appear after the leaves have dropped. There are male and female flowers on the same plant, attracting large numbers of nectar-feeding birds. They usually grow in sandy area on hills and amongst sandstone and basalt rocks.  


 I confess I had never heard of the flower below before this trip - the Bat Wing Coral Tree - Erythrina vespertilio. The pea shaped scarlet flowers are produced along 30cm racemes and appear when the tree is mainly leafless during winter and spring.  There was a huge tree near the access gate we went through on the way to Mornington Wilderness camp about 90 kilometres south of the Gibb River Road. There was a flock of Red-Collared Lorikeet - Trichoglossus rubritorquis - chattering noisily as they enjoyed the blossom.

I love the unexpected nature of wildflower photography as you never quite know what you will find and it is thrilling to find varieties you haven’t seen or photographed before, especially the rarer species.


And below is Rosella - Hibiscus sabdariffa -  a species of Hibiscus. The petals of this plant, which are very high in Vitamin C, can be made into jam. They have a delicious sour-sweet taste. This was another plant that I had never seen before, though I had tasted the jam made by a local friend - delicious! I would love to see if I can grow this at home. We saw these plants near the Barnett River just off the Gibb River Road and at Mt Elizabeth Station. More info on the Rosella plant here - Green Harvest


I hope you have enjoyed these few wildflowers of the Kimberley. So much red! But then that is the colour of the Kimberley dirt. I have many more wildflower photos to share with you soon. In the meantime you might like to visit a couple of my posts (see the links below) where I give you a few tips about photographing wildflowers. But my most important tip is - get out there with your camera! 


Taking wildflower photos doesn’t need to be complicated. Slow down, think about your camera settings, choose the best specimen, and think about composition, orientation and how you want your photo to look. Are you going to get in close or take a wider view? Do both, and take photos from various angles. Set your aperture according to how much depth of field do you want. Remember small numbers ie F4.6 equals shallow depth of field with a soft blurred background.

Photographing Wildflowers 
How to take great wildflower photos 


Thank you so much for stopping by. I value your comments and look forward to hearing from you. I will try to visit your blogs in return. Have a wonderful week. 
I am linking up to the link-ups below. Please click on the links to see fabulous contributions from around the world - virtual touring at its best!
   

Monday, 31 July 2023

Let's bake muffins

 Hi everyone. I hope you and yours are doing well. 

During the Covid lockdown in early 2020, my husband started baking muffins once every couple of weeks. There are lots of recipes on the net. I thought I might share with you the one he uses. They freeze well and you can heat them up in the microwave for breakfast - but I suggest you take them out the night before. 

This recipe came from Bake Play Smile.com/savoury-muffins

Prep time: 5 minutes    Cook time: 15 minutes    Makes: approx 9

Ingredients

300 g (2 cups) self-raising flour
40 g (½ cup) cheese grated
1 tbs chives chopped, fresh or dried
125 g butter melted
250 g (1cup) milk full fat
1 egg lightly beaten
100 g ham chopped
125 g corn kernels drained, or thawed (optional)                                  salt and pepper, to taste

        You could use grated carrot in place of bacon or instead of cheese and bacon use grated apple, chopped dates or sultanas. 

Instructions

Preheat oven to 180 degrees celsius (fan-forced). Place paper cases into a 12 hole muffin tin, spray with a little oil, and set aside. 

Sift the self-raising flour into a large bowl. Add all remaining ingredients and gently fold through with a metal spoon until just combined. 

Divide the mixture between the muffin holes, filling cases ⅔rd's full, and bake for 15-20 minutes or until golden. 

Allow to cool in the baking tin for 10 minutes before transferring to a wire rack to cool completely. 

The other day we found this recipe for pumpkin muffins

2 cups SR flour
¼ teaspoon salt
½ teaspoon cinnamon and ½ teaspoon nutmeg – or use 1 teaspon mixed spice
½ teaspoon bi-carb soda
½ cup brown sugar
½ cup milk
½ tablespoon oil
1 cup cooked mashed pumpkin
1 egg

Alternatives – sultanas or other dried fruit or grated apple

Mix all dry ingredients together. Add remaining ingredients. Bake 190C for about 20 minutes


And you can find the recipe for these herbie scones over on my blog post here - Winter Warmers - Minestrone soup and herb scones


Thank you so much for stopping by. Do you like muffins? Do you have a favourite recipe?
I value your comments and look forward to hearing from you. I will try to visit your blogs in return. Have a wonderful week. 
I am linking up to the link-ups below. Please click on the links to see fabulous contributions from around the world - virtual touring at its best!

Tuesday, 18 July 2023

Experimenting with wet cyanotype

 Hi everyone. I hope you and yours are doing well. Last December I blogged about the basics for Cyanotype printing. ie using the sun to do prints. If you missed it you can take a look here - Cyanotype sun prints - how to - the basics


I am certainly not an expert and there are lots of llinks on the net to learn more. 
Recently I have started experimenting with wet cyanotype. 


You start with the same mixture. These 2 bottles that you can buy from a craft store or online. They come as a powder in the bottle which you mix in the bottle with water, and then seal till you are ready to use. Then mix a small amount of equal proportions in a dish and paint onto your paper. (only mix the amount you need as it will not keep once mixed)

In the dry cyanotype method you paint the mixutre onto your paper and then leave the paper to dry in a dark place. Then store in a dark container till ready to use. 

In the wet cyanotype method you use the papers straight away while still wet. When first painted on the paper is yellow. It changes colour when exposed to the sunlight - first turning bronze. 

You want a paper than can withstand soaking. I use a printmakers paper. You could also use watercolour paper. Try different papers. 

You can use just about anything for the print - leaves, flowers, seaweed, feathers, lace, string - anything really. Where the piece lays will be white. I have found narrower pieces better, expecially if I am making prints which I will use for greeting cards. 


You can experiment by spraying onto your paper vinegar, soap suds, and sprinkling with paprika, tumeric, salt - then lay on your leaves and your glass. You can put wet crumpled plastic wrap over the glass for an extra effect - I keep reusing the same plastic. 

Have your paper on a stiff board, and clip your glass onto the board all around to get a firm contact. Glass from an old picture frame is great for this. I really should tape the edges of my glass. Or your could use perspex. Then put out in the sun and watch the magic happen. Depending on the strgth of the sun leave for half an hour to 2-3 hours - longer if it is a cloudy day.  Some people leave it outside for hours. 


Then the paper is rinsed in water for a few minutes and left to dry. 

Here are the results of some of my experiments with wet cyanotype. The yellow is from the tumeric. I know I have a lot to learn and so many more things I want to try. Experimenting with wet cyanotype is so much fun! 


Here are some links where you can learn from artists so much more proficient than me. Their artwork is so beautiful and inspiring. -  and a little video by Marianne Priest


Jacquard products.com/cyanotype

Thank you so much for stopping by. Have you tried cyanotype? Perhaps you would like to tell us about it in your comments. If you haven't I hope I have inspired you to give it a go. 

I value your comments and look forward to hearing from you. I will try to visit your blogs in return. Have a wonderful week. 
I am linking up to the link-ups below. Please click on the links to see fabulous contributions from around the world - virtual touring at its best!

Tuesday, 4 July 2023

Banksia or Dryandra? Western Australia

 Hi everyone, I hope you and yours are doing well. 

The last couple of posts I have taken you to the Dryandra Woodland National Park in Western Australia. And I shared there an image of a Dryandra flower. But is it a Dryandra or a Banksia? 

Since about 2007 there has been some discussion about this when the Dryandras were combined with Banksias. Below you can see the stages of the Banksia. They are easily recognised by the candle shape flower spikes and woody seed cones. 

Banksias are among Australia's most iconic plants. they were named after Sir Joseph Banks (1743-1820 ), who, in 1770, was the first European to collect specimens of these plants while on his voyage of discovery with Captain James Cook. Cook mapped the east coast of Australia which paved the way for British settlement 18 years later.

Banksias belong to the plant family Proteaceae. They range from ground hugging plants to 30 metre high trees.

Below here you can see a Candlestick Banksia from bud to cone.

There are 78 known species of banksia, 76 species in Australia, 62 of which are endemic to Western Australia, and 30 of these growing between Esperance and Walpole on our southern coast. In recent years the genus Dryandra has been incorporated into the genus Banksia, so the genus now totals 173 species.

There is however differing views on whether the Dryandras should be classified as Banksias.

The former Dryandra names are listed alongside the corresponding Banksia names, where appropriate. Regardless of this scientific re-classification, species previously classified under Dryandra remain quite distinctive horticulturally and will undoubtedly still be called dryandras in common usage. 

You can read more about this here - Australian Native Plants Society

Dryandras are common in the Dryandra Woodland.

Here are a few we saw on a visit in early June. I will try to identy them for you. But I am not an expert.

This I believe to be Banksia (Dryandra) sphaerocarpa - Fox Banksia. You can see here a new flower and a dry flower head


This is Banksia (Dryandra) sessilis - Parrot Bush - known by the Aboriginal Noongar people as budjan or butual


This is Banksia (Dryandra) nobilis - Golden Dryanda

I am not sure about these three - but I believe from the shape that they are Dryandras


Despte the obvious difference in flower shape between the Dryandras and the Banksias they mostly all have a distinctly banksia shape leaf. However each banksia leaf is different - and I only learnt this year that this is a good way of identifying the type of Banksia by comparing the leaves.


You might also enjoy some of my previous Banksia posts - 

The iconic Australian banksias

Celebration of the Australian Banksia

The Candlestick Banksia - it must be November

No doubt the jury will be out for a while about whether the Dryandras should have been icorporated with the Banksias. 

Below is some more reading from the Australian Native Plant Society - along with two discussion papers of opposing ideas from Alex George and Kevin Thiele.


anpsa.org.au/dryandra

Another plant that is seen in Dryandra is the yellow, red and gold Poison bush (Gastrolobium). The Poison Bush is a member of the pea family and contains a toxic substance that when synthesised is called '1080'. The poison bush has no effect on native amimals, but 1080 is used in baits to control feral animals such as foxes and feral cats which are a threat to native animals and birds. 


I hope you have enjoyed this post about another of Australia's beautiful wildflowers - the Dryandra.

Thank you so much for stopping by. I value your comments and look forward to hearing from you. I will try to visit your blogs in return. Have a wonderful week. 
I am linking up to the link-ups below. Please click on the links to see fabulous contributions from around the world - virtual touring at its best!