Welcome to Life Images by Jill

Welcome to Life Images by Jill.........Stepping into the light and bringing together the images and stories of our world. I am a photographer, writer and multi-media artist.
Focussing mainly on Western Australia and Australia, I am seeking to preserve images and memories of the beautiful world in which we live and the people in it.

Welcome!

Welcome!
PLEASE CLICK ON THE IMAGE TO GO TO MY RED BUBBLE STORE.
Showing posts with label craft. Show all posts

Monday, 12 December 2022

Cyanotype - sun prints - how to basics

 Hi everyone. I hope you and yours are well. It has been a couple of weeks since I blogged. In that time I was busy getting ready for a Christmas market stall, and then my family and I all caught Covid so we have been isolating, and honestly not felt like doing much. Thankfully we haven't been too sick, and were able to get antiviral medication which I think helped a lot. Now I am just tired and lethargic. 

So just a brief post from me today. You might recall a recent photo of some blue coloured prints. That is cyanotype. 


Cyanotype is an antique photographic printing process distinctive for producing Prussian blue monochromatic prints. Developed in the mid-19th century

It is fun and easy and the resulting prints are archival. You can use leaves, flowers, feathers, any 3d object, film negatives, crumpled plastic, whatever you like really. 

First you need the two chemicals, a cyanotype kit, which can be purchased from art stores. I bought mine from an on-line company here in Australia. 

The basic instructions, which should come with the kit, is to fill the two bottles with water, shake to mix, then leave for 24 hours. 

In subdued lighting mix equal quantities of the two liquids in a bowl and paint onto your target paper - the liquid will be greeny yellow on the paper.  

I used a printmakers paper, but you can try all sorts of paper, and also cloth. But use a paper that can withstand washing. Only make enough mixture as you need as it is only usable for 2-4 hours. I use 1 tablespoon of each for a small batch.  

Then dry the papers in the dark. If not using the painted papers straight away, keep in a darkened envelope or box which light cannot get into. 

Lay your leaves , or whatever you choose onto the paper. I put a piece of cardboard behind and a piece of perspex or glass on top, and clamp down with bulldog clips. Clamping prevents movement of the leaves during processing which will cause blury prints. I salvaged a piece of glass from an old photo frame. 

Put out into the sun or other UV source. Leave for up to 30 minutes, depending on how sunny the day is. Over-exposue is better than under-exposure. Your paper will look bronze in colour after proper exposure. 

Rinse in a tray of water for about 5 minutes. 

and then leave to dry, but not in direct sunlight. 


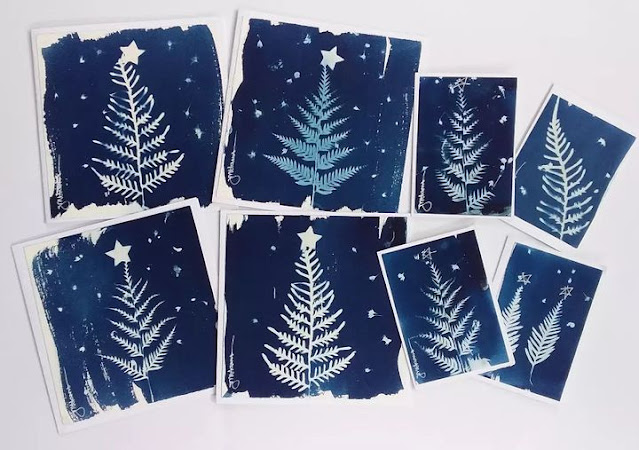
I have been using my cyanotypes to make greeting cards - I thought these ferns look like Christmas trees - I've added other flowers to look like snow. 

And I also made this tote bag which sold at the market. This is a very useful fern I have in my garden. 


So there you have it. Just the basics of cyanotype. I am certianly not an expert. I still have other cyanotype avenues I want to experiemtn with - like wet cyanotypes.  You can find out more information by searching on the web. 

Here are a couple of suggestions to read further and find inspiration: Have fun and experiment! 

Kim Herringe - playing with Cyanotype

Instagram-Cyanotype masters

Instagram - Indigo Moth

Have you ever played with Cyanotype? - perhaps you would like to tello us about it in your comments. 

Thank you so much for stopping by. I value your comments and look forward to hearing from you. I will try to visit your blogs in return. Have a wonderful week. 
I am linking up to the link-ups below. Please click on the links to see fabulous contributions from around the world - virtual touring at its best!
   

Hello there! I love reading your comments. If you scroll down to the bottom you can comment too! I would love to hear from you.

Tuesday, 26 July 2022

Exploring Felting - and making a felt flower

 Hi everyone. I hope you and yours are well. In the northern hemisphere I know there have been very hot summer temperatures and devistating fires, while down here in winter-time Australia we have had a lot of rain in the south and floods on our east coast. It is cold and wet where I live in the south west of Western Australia. But I am grateful for the rain though it does sometimes interrupt my daily walk.  

I have never been much intersted in felting. But a few weeks ago I "discovered" the Felting Pot Sudio in the lovely Fullers Coop - basically a big shed with lots of artisans in their own lock up spaces. They are mostly open Thursday to Saturday - with the cafe open Monday to Saturday. It is our new favourite place for lunch with friends. Only about 15 minutes from my home by car and no problem with parking. There are even comfy chairs with knee rugs if you are feeling the cold. 


Anyway after I discovered the Felting Pot Studio which I must say is full of deliciousness for crafters, and chatted to the owner Natalie, I liked them on Facebook and then saw an advertisement for a beginners felting workshop - a day workshop where you make a felt flower. So I enrolled. What a great day I had with a lovely group of ladies. Natalie went through the steps so clearly and we all came home with a felt flower. 

Now I am not going to pretend I know much about felting - you would need to go to a workshop yourself - and there are You Tube videos - but I think a hands-on workshop is a much better idea. 

Felting is I discovered very labour intensive! There is a lot of pulling, rubbing, pounding and rolling, soap and water involved. And surprising to me - bubblewrap! 


Starting with a selection of "wool top" (top left below) we all ended up with a beautiful felt flower! Below you can see my finished flower on the right. I added some gold thread stitching and some little beads I had at home left over from some other long forgotten project. I was really happy with the result. 


Please click on read more to continue reading...

Monday, 18 March 2019

To do list overload

Ok, first off, I am not complaining, as I know the alternative is not good, but I seem to have a "to do" list overload. And this is retirement! Where is the time sitting in the garden reading a book or strolling along the beach! ha! But seriously my "to-do" list is wearing me down at the moment and causing me to stress and feel rather over-whelmed by it all as I see time zooming by and end dates getting closer. 

So what is on my to-do list this week, other than the usual around home things?

Today, Monday, I had some Photography club web-site work, and Centrelink computer stuff to do. Plus washing and a bit of gardening. And doing some work towards my art market on the weekend. Tick

Tomorrow, Tuesday, I am going to an eco-dying workshop an hours drive from home. I am looking forward to this as I have been playing around with eco-dying (leaves on fabric and paper) for a couple of years and I am ready to learn more. Yes I will share in a later post.


Wednesday I have lunch with a couple of friends. We've been meeting up for lunch for over 15 years, and have been through a lot together, and we really don't like it when we have to miss a lunch. We say it is cheaper than therapy! Plus I have some jobs to do in town while I am there.  Honestly we don't care where we go for lunch - even a muffin will do - as long as we meet up. 

Oh, and my Spanish dance class Wednesday evening. 


Thursday I have to get all my bits and pieces together for the Tree Street Art Safari on Saturday.  I had a stall last year at the home of Maggie in Banksia Street and had a lovely sheltered spot to display my wares. The idea is that home owners host artists in the "tree street" area of town and visitors walk from venue to venue. The tree street area is lovely with it's old weatherboard houses and lovely gardens and the art safari is always well attended. I had a fabulous day last year and Maggie agreed to host me again. It is a lot of work it get all my stuff organised - photo prints, greeting cards, cushion covers and tote bags featuring my photography, paper flowers, and my eco-printing on scarves, prints, greeting cards and this year also cushion covers. Thank you Maggie!
 Friday I am going to an all day writing workshop organised by my writer's group. Bad timing for me really the day before the Art Safari. Got to get my pre-workshop reading done! 

Saturday I will be at the Art Safari all day. Saturday night we have our grandies staying over and all day Sunday.  I am sure they will like to put a movie on while Grandma and Pop collapse in a chair with a glass of wine on Saturday evening.

So that's it from me today.  Do you get overwhelmed with your to-do list? Anyways, I have to get back to it, so have a fabulous week! 

You might also like - hmm... looks like I've been here before....
 Being grateful for life in the retirement fast lane
Is life running too fast?  
Exploring your creative side in retirement 

Thank you so much for stopping by. I value your comments and look forward to hearing from you. I will try to visit your blogs in return. But please forgive me in advance, like I said I'm at bit overwhelmed at the moment! Have a wonderful week. 

I am linking up to the link-ups below. Please click on the links to see fabulous contributions from around the world - virtual touring at its best!


Hello there! I love reading your comments. If you scroll down to the bottom you can comment too! I would love to hear from you.

Sunday, 16 December 2018

It's beginning to look a lot like Christmas - December randomness

If you are anything like me once December hits Christmas seems to be here before we know it. So for today just some December randomness.

It is summer in Australia and the colours around where we live during the lead up to Christmas are vibrant - the yellow of the Candlestick Bankisa, the yellow-orange of the Australian Christmas tree and the purple of the Jacarandas.

And my front garden this time of year in particular looks a treat - with the yellow and green kangaroo paws flowering in profusion with the backdrop of red Coral Bush and purple agapanthus. 

LOL the tinsel garlands around my kangaroo paws are to keep the parrots away, but it doesn't seem to help too much. 


I've been to a few Christmas crafting free workshops lately in our local library, handprinting gift wrapping paper and making twig decorations, 


On Friday I went to another short workshop - floral gift wrapping toppers.  This one was run by lovely Francine Metcalfe from Pollen Nation Floral Studio. Francine makes the most glorious wreaths and bouquets from Australian natives and she is partners at the Green Depot floral studio and gift shop.  We simply wrapped boxes in brown paper, tied with string, and topped with florals. Inside the boxes we popped an inspirational card - a present to ourselves or to a special friend when you or they might need a boost. I spent a lovely hour with the ladies in the workshop.

This time of year there are parties and get-togethers with family and friends. We live in a small cul de sac street, and every year we have a "street party" on the front lawn, rotating which lawn hosts the party. We all bring our own chairs, drinks and a plate to share. This year I made Cranberry Brie Bites, which someone had shared on Facebook, from Delish.com - they really were delicious and oh so easy to make. Here is a link to the recipe - Cranberry Brie Bites. 
I used almond slivers instead of the pecans and didn't use the rosemary springs. I used puff pastry sheets and the recipe made about 30 small tarts. They are just as good cold. 

I am yet to do my Christmas baking - but will have to get to it this week!
This is also the time of year for cherries - yum!

Thank you so much for stopping by. I hope you have enjoyed my little look at the lead up to Christmas. I value your comments and look forward to hearing from you. I will try to visit your blogs in return. Have a wonderful week. 

I am linking up to the link-ups below. Please click on the links to see fabulous contributions from around the world - virtual touring at its best!
Life in Reflection

Hello there! I love reading your comments. If you scroll down to the bottom you can comment too! I would love to hear from you.

If you are a blogger you can also link your blog to Wednesday Around the World at Communal Global. 


Monday, 10 December 2018

How to fold a book Christmas tree table decoration

Do you do Christmas crafting? A few years ago I tore this how-to page out of a magazine. The project was to make Christmas tree table decorations from old books. I put the page away to do "later". It is now "later". 


I had a quiet morning to myself the other day, so I sat down with the bits and pieces I had, to make the book tree. I had stored away a couple of 6-monthly programme books from our city entertainment centre which had a thicker paper and coloured pictures which I thought would be nice to add some colour to my book tree. Old Reader's Digest condensed books, or unloved paper back books, the ones with slightly thicker paper, are great for these projects too.
The instructions say you need about a 100-150 page book for this project.  It is a good idea to have a paper folding tool or a ruler, so you can fold nice crisp edges, and work on a firm surface.


First you need to carefully tear off the cover of the book.  Then fold over the right hand side of the first page diagonally longways so it lines up with the spine.


 Then fold this page again diagonally longways, so it again lines up with the spine. Sharpen your folds with your folding tool and make sure you get your fold right into the spine as far as you can.


 Then fold up the little triangle at the bottom of the page, and tuck it in, so that the tree has a flat bottom.
Repeat with the rest of the book.

Form the completed folded pages into the tree shape, and put a line of glue down the spine to hold. I had two 50 page books, which I glued together once I had folded all the pages. Make a star to go on the top, or decorate as you like.  For some reason I didn't end up with a star on the top of mine, I might have to fix that!


 Another project I did this week was started at one of the free mini workshops at our local library - making stars and trees out of twigs. All you need is thin twigs, a hot glue gun, leaves, gold, silver, red or glitter paint if you wish, string, ribbon and embellishments. Thin florestry wire is also useful. These can be small to hang on a tree or bigger to decorate your front door instead of a wreath. And can be as plain or decorative as you wish.

 Thank you so much for stopping by. Do you have a craft project for Christmas. Perhaps you would like to tell us about it in your comments. I value your comments and look forward to hearing from you. I will try to visit your blogs in return. Have a wonderful week.  

You might also like:
How to make a paper wreath 
How to make a simple paper flower 
Exploring your creative side in retirement

I am linking up to the link-ups below. Please click on the links to see fabulous contributions from around the world - virtual touring at its best!
Life in Reflection

Hello there! I love reading your comments. If you scroll down to the bottom you can comment too! I would love to hear from you.

If you are a blogger you can also link your blog to Wednesday Around the World at Communal Global.