Welcome to Life Images by Jill

Welcome to Life Images by Jill.........Stepping into the light and bringing together the images and stories of our world. I am a photographer, writer and multi-media artist.
Focussing mainly on Western Australia and Australia, I am seeking to preserve images and memories of the beautiful world in which we live and the people in it.

Welcome!

Welcome!
PLEASE CLICK ON THE IMAGE TO GO TO MY RED BUBBLE STORE.
Showing posts with label cyanotype- sunprinting. Show all posts

Tuesday, 18 July 2023

Experimenting with wet cyanotype

 Hi everyone. I hope you and yours are doing well. Last December I blogged about the basics for Cyanotype printing. ie using the sun to do prints. If you missed it you can take a look here - Cyanotype sun prints - how to - the basics


I am certainly not an expert and there are lots of llinks on the net to learn more. 
Recently I have started experimenting with wet cyanotype. 


You start with the same mixture. These 2 bottles that you can buy from a craft store or online. They come as a powder in the bottle which you mix in the bottle with water, and then seal till you are ready to use. Then mix a small amount of equal proportions in a dish and paint onto your paper. (only mix the amount you need as it will not keep once mixed)

In the dry cyanotype method you paint the mixutre onto your paper and then leave the paper to dry in a dark place. Then store in a dark container till ready to use. 

In the wet cyanotype method you use the papers straight away while still wet. When first painted on the paper is yellow. It changes colour when exposed to the sunlight - first turning bronze. 

You want a paper than can withstand soaking. I use a printmakers paper. You could also use watercolour paper. Try different papers. 

You can use just about anything for the print - leaves, flowers, seaweed, feathers, lace, string - anything really. Where the piece lays will be white. I have found narrower pieces better, expecially if I am making prints which I will use for greeting cards. 


You can experiment by spraying onto your paper vinegar, soap suds, and sprinkling with paprika, tumeric, salt - then lay on your leaves and your glass. You can put wet crumpled plastic wrap over the glass for an extra effect - I keep reusing the same plastic. 

Have your paper on a stiff board, and clip your glass onto the board all around to get a firm contact. Glass from an old picture frame is great for this. I really should tape the edges of my glass. Or your could use perspex. Then put out in the sun and watch the magic happen. Depending on the strgth of the sun leave for half an hour to 2-3 hours - longer if it is a cloudy day.  Some people leave it outside for hours. 


Then the paper is rinsed in water for a few minutes and left to dry. 

Here are the results of some of my experiments with wet cyanotype. The yellow is from the tumeric. I know I have a lot to learn and so many more things I want to try. Experimenting with wet cyanotype is so much fun! 


Here are some links where you can learn from artists so much more proficient than me. Their artwork is so beautiful and inspiring. -  and a little video by Marianne Priest - 


Jacquard products.com/cyanotype

Thank you so much for stopping by. Have you tried cyanotype? Perhaps you would like to tell us about it in your comments. If you haven't I hope I have inspired you to give it a go. 

I value your comments and look forward to hearing from you. I will try to visit your blogs in return. Have a wonderful week. 
I am linking up to the link-ups below. Please click on the links to see fabulous contributions from around the world - virtual touring at its best!

Monday, 12 December 2022

Cyanotype - sun prints - how to basics

 Hi everyone. I hope you and yours are well. It has been a couple of weeks since I blogged. In that time I was busy getting ready for a Christmas market stall, and then my family and I all caught Covid so we have been isolating, and honestly not felt like doing much. Thankfully we haven't been too sick, and were able to get antiviral medication which I think helped a lot. Now I am just tired and lethargic. 

So just a brief post from me today. You might recall a recent photo of some blue coloured prints. That is cyanotype. 


Cyanotype is an antique photographic printing process distinctive for producing Prussian blue monochromatic prints. Developed in the mid-19th century

It is fun and easy and the resulting prints are archival. You can use leaves, flowers, feathers, any 3d object, film negatives, crumpled plastic, whatever you like really. 

First you need the two chemicals, a cyanotype kit, which can be purchased from art stores. I bought mine from an on-line company here in Australia. 

The basic instructions, which should come with the kit, is to fill the two bottles with water, shake to mix, then leave for 24 hours. 

In subdued lighting mix equal quantities of the two liquids in a bowl and paint onto your target paper - the liquid will be greeny yellow on the paper.  

I used a printmakers paper, but you can try all sorts of paper, and also cloth. But use a paper that can withstand washing. Only make enough mixture as you need as it is only usable for 2-4 hours. I use 1 tablespoon of each for a small batch.  

Then dry the papers in the dark. If not using the painted papers straight away, keep in a darkened envelope or box which light cannot get into. 

Lay your leaves , or whatever you choose onto the paper. I put a piece of cardboard behind and a piece of perspex or glass on top, and clamp down with bulldog clips. Clamping prevents movement of the leaves during processing which will cause blury prints. I salvaged a piece of glass from an old photo frame. 

Put out into the sun or other UV source. Leave for up to 30 minutes, depending on how sunny the day is. Over-exposue is better than under-exposure. Your paper will look bronze in colour after proper exposure. 

Rinse in a tray of water for about 5 minutes. 

and then leave to dry, but not in direct sunlight. 


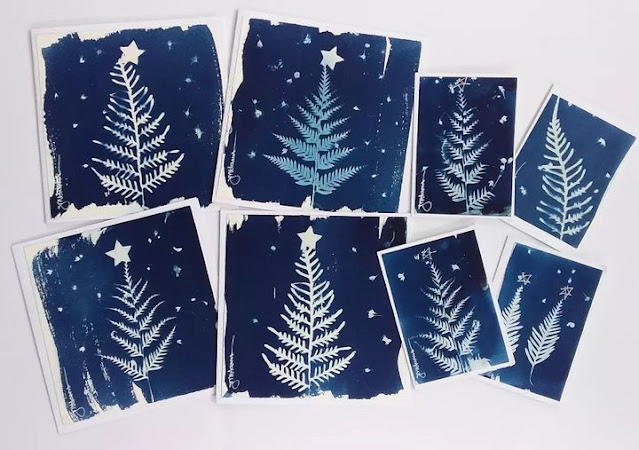
I have been using my cyanotypes to make greeting cards - I thought these ferns look like Christmas trees - I've added other flowers to look like snow. 

And I also made this tote bag which sold at the market. This is a very useful fern I have in my garden. 


So there you have it. Just the basics of cyanotype. I am certianly not an expert. I still have other cyanotype avenues I want to experiemtn with - like wet cyanotypes.  You can find out more information by searching on the web. 

Here are a couple of suggestions to read further and find inspiration: Have fun and experiment! 

Kim Herringe - playing with Cyanotype

Instagram-Cyanotype masters

Instagram - Indigo Moth

Have you ever played with Cyanotype? - perhaps you would like to tello us about it in your comments. 

Thank you so much for stopping by. I value your comments and look forward to hearing from you. I will try to visit your blogs in return. Have a wonderful week. 
I am linking up to the link-ups below. Please click on the links to see fabulous contributions from around the world - virtual touring at its best!
   

Hello there! I love reading your comments. If you scroll down to the bottom you can comment too! I would love to hear from you.