Welcome to Life Images by Jill

Welcome to Life Images by Jill.........Stepping into the light and bringing together the images and stories of our world. I am a photographer, writer and multi-media artist.
Focussing mainly on Western Australia and Australia, I am seeking to preserve images and memories of the beautiful world in which we live and the people in it.

Welcome!

Welcome!
PLEASE CLICK ON THE IMAGE TO GO TO MY RED BUBBLE STORE.

Monday, 16 September 2013

Lucky me - new outfit through Lifestyle Fifty!


I was recently the very lucky winner of an new outfit from WLane and Betts through Jo Castro's Lifestyle Fifty Blog - take a look and tell me what you think! - and then go into WLane in Bunbury Centrepoint Shopping Centre and see for yourself what a fabulous new outfit can do for you - their clothes are fantastic for the more mature lady who still loves to look good -  and a pair of Airlfex shoes from Betts have to be the most comfortable shoes out there for our mature and not so mature feet.

seriously you should take a look at Jo Castro's Lifestyle Fifty website - subscribe, comment, read, and you could be a winner one day just like me! You will love Jo's Lifestyle Fifty blog.

http://lifestylefifty.com/funky-new-look-for-spring-reader-makeoverver/#comment-176

PicMonkey Collage 1


I am linking up to Mosaic Monday, Our World Tuesday, Tuesday Around the World, What's It Wednesday. Please click on the links to see fabulous contributions from around the world - virtual touring at its best!

Mosaic Monday
Our World Tuesday
Tuesday Around the World  
What's It Wednesday

Sunday, 8 September 2013

Dehydrating food for camping saves space and weight

I told a friend the other day that I was dehydrating food in preparation for a camping trip and she wanted to know what it was all about. 


 I was first introduced to dehydrated food when I went walking on the Bibbulmun Track in Western Australia with a two friends a few years ago.  Berndard walked the whole track (nearly 1,000kms in total), and knew just about everything that one would want to know about dehydrating food. When you are walking for a week at a time and carrying all your food with you, you need to keep weight to a minimum.  Here is a great blog site that Bernard told me about (although I notice it hasn't been added to lately) - Dehydrated bushwalking food


 Dehydrating food for a hiking or camping trip is great for both space saving and weight saving and extends the life of the food in comparison the taking fresh food.The drying process only minimally affects its nutritional value. 

Check out some facts at -  Greensmoothie - dehydrating facts - who says:
 Drying food only minimally affects its nutritional value. Most research has been on foods that were commercially dried. When you dry foods at home under gentle conditions (correct temperature and a reasonable drying period) you produce a high-quality nutrient-rich food.
Compared with canning, freezing and baking, all of which involve extreme temperatures, food drying is the least damaging form of food preservation. 

Dehydrated potatoes
 We always taking fresh fruit and vegetables with us, but I also dry vegetables such as carrots, corn and potatoes to use when the fresh variety run out.  You can also dry fresh fruit in season, like apples, apricots etc or make fruit leathers. From my experience the fruit leathers require no sugar and are naturally sweet and delicious. Unfortunately I don't have a picture of them here.

Follow the recommendations of the manufacturer of your dehydrator for preparation. For these carrots I peel, slice thinly, then steam for 5 minutes, rinse under cold water, and then lay out the circles on the trays as you can see here.  The processing of the dehydrating usually takes all day (depending on what you are dehydrating), so start first thing in the morning to be completed by early evening.


 I also dry mince and make a few meals like curry, spaghetti bolognaise and chilli con carne and dry them as well. But these I keep in the freezer as they contain meat and I want to be sure they are not going to spoil.  Here I am dehydrating Chilli Con Carne. Can you believe that is 400 grams of meat, plus vegetables in each of those two small zip lock bags?


Lay out your cooked meal or vegetables, pop on the lid of the dehydrator, and turn it on to the recommended temperature. An important tip here is to either put the dehydrator in the shed or in the laundry with the door through to the house closed and the outside door and window open, otherwise the smell of the drying will invade your house!

It is also not a good idea to mix flavours in the same drying batch - for instance I wouldn't dry mince on one tray and apple slices on another.  But carrots, corn and potatoes can happily be dried together in the same batch. 


 When you are on your camping trip, the morning you want to use one of the dehydrated meals or dried mince, just take out the packet, put it in a box with a sealable lid and cover with water. At this point also add any dried vegetables you intend using. By the end of the day the food will be re-hydrated and ready to reheat or cook into what ever meal you are making. Easy! 


I have just read on the Dehydrated bushwalking food  site that when they get to their campsite they boil some water, empty their snaplock bag of food into the pot, add the boiling water, stir, pop on the lid and leave for half to one hour. Then boil the rehdryrated ingredients, add a packet sauce mix, and simmer for 3-5 minutes. Add rice, pasta, cous cous or noodles, and simmer for another 5 minutes. Easy! 


Another camp food my son always asks for is fish rolls.  They are made from a tin of fish, grated carrot, potato, onion, and a curry sauce mixture, rolled into pastry and cooked in the oven. They can be eaten hot or cold. For camping trips I freeze and take out on the day how many we need. They are a delicious on the road lunch time food.


Just remember to take them out of the freezer in time to thaw out by lunch time, or you will be trying to defrost them on the dashboard! Is this what they call dashboard dining?


There are quite a few sites on the net about dehydrating food. As well as the ones I have already mentioned  are a couple that might be of interest -
Back packing chef
The Camp Gal

And my previous post about camp food - 
Camp food - touring the Western Australian northern wheatbelt

Thanks for stopping by. 

I am linking up to Mosaic Monday, Travel Photos Monday, Our World Tuesday, Tuesday Around the World, Travel Photo Thursday, What's It Wednesday, and Oh the Places I've Been. Please click on the links to see fabulous contributions from around the world - virtual touring at its best!

Mosaic Monday
Travel Photo Mondays
Our World Tuesday
Tuesday Around the World  
What's It Wednesday
Travel Photo Thursday
 Oh The Places I've Been

Monday, 2 September 2013

Rock building blocks - water catchments, sheep yards and bridges, Australia

Going back to ancient times rocks have been the building blocks used by civilisations around the world. Since then man has continued to make use of rocks to build castles, fortifications, fences, wells, dams, buildings, churches, bridges, roads. Wherever you go you will see evidence of building with rocks. 

Australia is no exception. We saw this old coach house on the Perth to Albany road in Arthur River in Western Australia. I love the way the different size rocks have been fitted together. No doubt the thickness of the walls helped keep the inside of the building cool.

Sometimes when you travel about you see a slightly unusual use of rocks as building blocks.


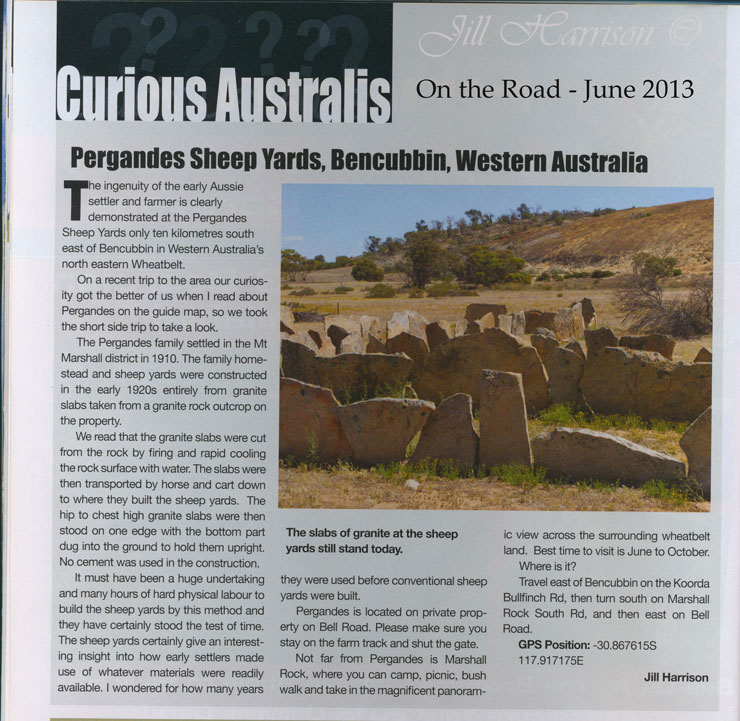
PERGANDES SHEEP YARDS - BENCUBBIN, WESTERN AUSTRALIA

The ingenuity of the early Aussie settler and farmer is clearly demonstrated at the Pergandes Sheep Yards only ten kilometres south east of Bencubbin in Western Australia’s north eastern Wheatbelt.
On a trip last year through this area our curiosity got the better of us when I read about Pergandes on the guide map, so we took the short side trip to take a look.
The Pergandes family settled in the Mt Marshall district in 1910. The family homestead and sheep yards were constructed in the early 1920s entirely from granite slabs taken from a granite rock outcrop on the property.  You can see the slab walls of the sheep yards below with the granite rock from which they were taken in the background.


We read that the granite slabs were cut from the rock by firing and rapid cooling the rock surface with water. The slabs were then transported by horse and cart down to where they built the sheep yards.  The hip to chest high granite slabs were then stood on one edge with the bottom part dug into the ground to hold them upright. No cement was used in the construction.
It must have been many hours of hard physical labour to build the sheep yards by this method and they have certainly stood the test of time.  The sheep yards gave us an interesting insight into how early settlers made use of whatever materials were readily available. I wondered for how many years they were used before conventional sheep yards were built.
Pergandes is located on private property on Bell Road. Please make sure you stay on the farm track and shut the gate.

Not far from Pergandes is Marshall Rock, where you can camp, picnic, bush walk and take in the magnificent panoramic views across the surrounding wheatbelt land.  Best time to visit is June to October.

Where is it?
Travel east of Bencubbin on the Koorda Bullfinch Rd, then turn south on Marshall Rock South Rd, and then east on Bell Road.

My article about Pergandes Sheepyards was published in the Curious Australia section of On The Road magazine, June 2013


BERINGBOODING ROCK CATCHMENT AND TANK, WESTERN AUSTRALIA
Rock walls used to trap and divert water are quite a common sight on granite outcrops around the Western Australian wheatbelt. Some of these rock walls may be quite low as this one at McDermid Rock along the Hyden to Norseman Road shows -


Or they can be major constructions, which I talked about in my earlier posts - which you can click here to read -
Camping with heritage - Karalee and Boondi Rocks
Cave Hill, Burra Rock and the Woodlines

Tank and campsite at Beringbooding Rock.
One such major construction is the rock catchment and ten and a quarter million litre water tank at Beringbooding Rock - the largest rock water catchment tank in Australia.  
The Beringbooding catchment and tank were built by sustenance labour over two years 1937-38, providing employment for about one hundred men at a cost of 10,000 pounds. The men were brought by rail from Perth to Bonnie Rock each Friday and given one weeks work for each dependant child – for example four children equalled four weeks work. 
One wonders the impressions of these city men when they were deposited here in the far north-eastern corner of the wheatbelt beyond which lies uninhabited scrubland.
Rock walls hewn from the rock itself encircle the rock and channel the water via a concrete aqueduct into the tank. Big fires were lit on the granite and allowed to burn all night making the rock red hot. Water was then poured over the rock and the granite exploded in big layers. These slabs were sledged away and stood on their sides and cemented together to form the rock walls to channel the water into the tank.  

In the image here you can see a rock wall around a depression on the rock called a gnamma hole. The water you see is collected rainfall. The wall prevents run off from the rock into the depression, redirecting it instead into the tank which you can see in the distance.

The water in the tank is still used today for crop spraying and drinking water for stock, but is not suitable for human consumption.
An information map at the base of the tank outlines the 2.3 kilometre walking trail over the rock to various natural features and spectacular 360 degree views over grain-growing farmland to the south and west, and virgin bushland to the north and east - allow a minimum of one and a half hours. The rock cairn at the rock’s highest point was built in 1889 by surveyor HS King.

Beringbooding Rock is a great place to camp overnight and the walk is well worth the effort.
Where is it:  
Located near the intersection of Beringbooding and Cunderin Roads, about 70 kilometres north east of Mukinbudin and 13 kilometres east of the Bonnie Rock wheat bin in the Western Australian north-eastern wheatbelt. 
My article about camping at Beringbooding Rock was published in On The Road Guide to Free Campsites 2013-2014.


SPIKEY BRIDGE, TASMANIA, AUSTRALIA

Another unusual construction is Spiky Bridge, located just over seven kilometres south of Swansea on Tasmania’s east coast. The bridge is a curious relic of Tasmania’s convict era and one of many convict built bridges in Tasmania.

Listed on the register of Heritage Places, Spiky Bridge was built by convicts in 1843 along the old convict-built coach road connecting Swansea to Little Swanport and the east coast road to Hobart.

The parapet was constructed using hundreds of jagged local fieldstones vertically stood on end – hence the name Spiky Bridge.

The reason why the bridge was decorated in this fashion is the subject of speculation. One theory says it was to stop cattle falling into the gully, whilst another suggests that the convicts building the bridge used it as a form of revenge.  Either way, the Spiky Bridge is now a curious stopping point for tourists.
Popular history says the bridge was built after Irishman Edward Shaw of Redbanks gave his friend Major de Gillern, Superintendent of Rocky Hills Probation Station, a ride home one night after a game of piquet.  Shaw had repeatedly requested that improvements be made to the road between Swansea and Little Swanport, particularly the steep gully south of Swansea. His requests had evidently fallen on deaf ears and to prove his point Shaw drove his gig and his passenger, the Major, through the gully at full gallop. It must have been an thoroughly unpleasant trip because the bridge was erected shortly afterwards.
Initially the bridge was called Lafarelle’s Bridge after surveyor and civil engineer Thomas Lafarelle who was Assistant Superintendent at Rocky Hills Station. Lafarelle probably supervised the building of the bridge.
Swansea is Tasmania 's oldest seaside town.  It was first settled by the Welsh in the 1820s who named it Waterloo Point.  It was renamed Swansea in 1842. 
Where is it?
Turnoff is on the western side of the Tasman Highway, 7.5 kilometres south of Swansea on Tasmania’s east coast.

You can read more about Tasmania by clicking here to go to my blog post - Great short walks in Tasmania


My article about Spiky Bridge was printed in the Curious Australia section of On The Road magazine, January 2013
Thanks for stopping by. I hope you have enjoyed this little look into rock building blocks. Do you have some unusual rock constructions in your area?

I am linking up to Mosaic Monday, Travel Photos Monday, Our World Tuesday, Tuesday Around the World, Travel Photo Thursday, What's It Wednesday, and Oh the Places I've Been. Please click on the links to see fabulous contributions from around the world - virtual touring at its best!

Mosaic Monday
Travel Photo Mondays
Our World Tuesday
Tuesday Around the World  
What's It Wednesday
Travel Photo Thursday
 Oh The Places I've Been

Saturday, 24 August 2013

Getting that cover shot of the Holland Track, Western Australia

If you are a regular regular reader to my blog you might remember that we took a trip along the remote Holland Track south of the Western Australian Goldfields back in April.  If you missed it you can read about it by clicking here - Holland Track - Following the goldrush prospectors


The Holland Track is one of WA's great 4WDrive treks. It lies within the environmentally significant Great Western Woodlands which covers sixteen million hectares and is the largest and healthiest remaining Mediterranean climate woodland left on earth. 


I wrote about our trip for Go Camping & 4WD Adventures Australia magazine - Go Camping on Facebook  - and my story was published in their August-September 2013.

I was excited to see that they used one of my pics for the front cover! You can see the original image below on the left and the cover on the right.  Contrary to what I wrote about capturing cover images in my February blog post - What makes a good magazine cover - they used a horizontal photo, cropped to vertical. You don't always know what the design editor is looking for. So take lots of pics, from different angles and view points. Even though I always say your choice of camera is not important, just get the shot, using a good quality camera with a high resolution image will increase your chances - especially if the magazine decides to crop. But see how the image allows for the magazine's mast head, and space to tell prospective readers what articles they will find in the magazine.  I think what might have won this image over was the camper trailer in the shot.


The image I thought they would use for the cover, they used for the opening page to my article. You can see it below here. They have cropped slightly, but the big section of mud at the bottom of the shot has allowed them to print the first part of the article over the image for the opening page. 
When I presented entered this image at my photography group last month, I didn't receive a very good response for the judge. But I am reminded, that judging is subjective, what one person likes another might not. In this case I have been rewarded because the magazine have published and paid for my shot. 


Of course to get a shot like this you need to first "see" the shot before you take it, and then get out and prepared to stand in the mud and take lots of shots to get that one shot that the magazine will like. 

You need to travel with people who support you and are prepared to stop, wait and be patient while you take pictures. It can add quite a bit of time onto your trip if you are stopping to take photos. My husband is used to that call to "stop the car"! Numerous times I have been left on the side of an outback road while I wait for my husband to drive ahead, or back and then drive towards me so I can get a driving shot.

 As you can see the Holland Track was very muddy when we travelled in late April so you need to drive according to the conditions. It is best to travel the track during autumn and spring not during winter or after rain, and you should travel with others. The track was a variety of mud, sand, rock and gravel and in places corrugated and tightly winding with scrub and trees right up to the edge of the track (impairing driver vision ahead), or hanging low over the track. 


Of course I couldn't get pics like this alone. My thanks go to my husband who drives me where I want to go, to my eldest son and his family who went with us and who have travelled the track before so had had experience of it, to Ryan Butler, the DEC Goldfields Regional Fire Co-Ordinator for background information and who I quoted in the article, and to my youngest son who travels with us with good humour, well mostly good humour. Without them a trek like this would not be possible for me. 

Tracks like the Holland Track are also a fantastic way to introduce children to bush camping, nature and history, and gets them away from the TV and computer games. There is plenty to play with out in the bush!  Two more pictures from my article.


- Where is it? – The 4WD only section runs in a north-easterly direction from 56 km east of Hyden on the Hyden-Norseman Road to Victoria Rock Road, 78km south of Coolgardie.  

-  Distance - Broomehill to Coolgardie is 731 km. 4WD section east of Hyden to Victoria Rock Road is 170 km.

-  Including travel from Perth you can cover the Track over four days, so be prepared to camp. It is a very achievable trip for people wanting a remote 4WD and bush camping experience close to home.


Thanks for stopping by. I hope you have enjoyed this little review of my Holland Track trip. If you missed the original you can go back and see it by clicking here - Holland Track

I hope to bring you pics of our next camping adventure soon. 

As Jack from Perth who we met on the Holland Track and  who has been exploring lesser used tracks for over 35 years says  “There is always another track isn’t there.”

You might also enjoy - 

Cave Hill, Burra Rock and Woodlines
Camping with heritage - Karalee & Boondi Rocks
Bob Cooper - Australian survival expert


I am linking up to Mosaic Monday, Travel Photos Monday, Our World Tuesday, Tuesday Around the World, Travel Photo Thursday, What's It Wednesday, and Oh the Places I've Been. Please click on the links to see fabulous contributions from around the world - virtual touring at its best!

Mosaic Monday
Travel Photo Mondays
Our World Tuesday
Tuesday Around the World  
What's It Wednesday
Travel Photo Thursday
 Oh The Places I've Been

Monday, 19 August 2013

Travel and food - Clay Pot Chicken, Singapore

 Hi all, I decided to talk some more about food photography and travel as a follow up to my earlier post - Food photography is not just a bowl of cherries

Travel and food go hand in hand. Whenever we travel overseas I love to try different types of typical food. And it helps to be able to know a little about food photography to get a good pic to remember what you ate. I always have good intentions, but sometimes I have half eaten the food before I remember to take a pic!  And sometimes the lighting is not the best either.

A macro lens is a great lens to use for food photography, but I don't like carrying around my good macro lens, especially overseas, and anyway it gets too heavy after a while, and screams "photographer" ! On our recent trip to Singapore I took my great little Canon G11 - a go everywhere, light camera that has lots of SLR features and takes great pics.  Really it is not the camera that it is important, any camera and lens will do - it is you the photographer that takes the pic. 

You wouldn't want to get too close to this clay pot chicken cooking - a macro lens would be no good in this instance (although a 100mm would probably be ok) - those pots are hot!  Lucky there was a glass wall between the pots and the buyers and browsers.

We tried clay pot chicken at the hawkers food market at Sentosa in Singapore. It is great to take pics of not only the food, but the cooking, the cooks, the people, the location, to get the whole story. I take pics of information signs later as a way of collecting background info.


 From Wikipedia  - Claypot chicken rice (Chinese: 砂煲鸡饭, 瓦煲鸡饭 or 煲仔鸡饭) is usually a dinner dish in the southern regions of China, Malaysia and Singapore. It is typically served with Chinese sausage and vegetables. More often than not, the rice is cooked in the claypot first and cooked ingredients like diced chicken and Chinese sausage are added in later. Traditionally, the cooking is done over a charcoal stove, giving the dish a distinctive flavour. Some places serve it with dark soya sauce and also dried salted fish. Salted fish enhances the taste of the claypot chicken rice, depending on the diner's preference. Due to the time-consuming method of preparation and slow-cooking in a claypot, customers might have to wait a period of time (typically 15-30 minutes) before the dish is ready.


Thanks for stopping by. Do you take photos of food when you travel?

To find out more about food photography please go to my last blog post - by clicking here - Food photography is not just a bowl of cherries

I am linking up to Travel Photos Monday and Travel Photo Thursday, and Oh the Places I've Been, Please click on the links to see fabulous contributions from around the world - virtual touring at its best!

Travel Photo Mondays
Travel Photo Thursday
 Oh The Places I've Been

You might also like - Travel photography and camera settings

Food photography is not just a bowl of cherries.

Photographing food is an art in itself. I remember a food photographer saying "there is more to food photography than just taking a photo of a bowl of cherries". How true!


Recently I was thrilled to be asked to assist the Photography Group of Bunbury with a food photography workshop.  Photography Group of Bunbury


I wrote a few notes which I hope helped the participants with a tips to help them get started. 

Natural back lighting coming through west facing window
Lighting - natural, studio, spot, lightbox.  Back lighting or side lighting can be very effective.  You can also use reflectors and white board to bounce light.
You don’t necessarily need studio lights to photograph food.  A simple home set-up or speed-light works well especially when you are starting out.
Early morning light


Different types of lighting will evoke different emotions. 

Natural light on the patio


I love natural lighting. Study the light around your house - it will change during the day. For instance I know first thing in the morning that I have fabulous lighting on my patio, then it moves to my dining room window. In the afternoon the kitchen window and down the side of the house outside has nice warm lighting. 

Different times of year produce different types of lighting. The height of summer can be too bright and “hot” and create too much contrast between light and shadow.

 Don’t be put off by a cloudy day – clouds act as a great natural diffuser and even out the light.
Raining outside and you don’t have studio lights? – try a desk lamp or lightbox. 


Equipment - Don’t forget to adjust your white balance on your camera and learn to use manual camera settings. I think my photos improved dramatically when I learnt about manual settings.
Whilst a macro lens is preferable it certainly isn’t essential. Try a magnifying filter on a standard lens.
Consider using a tripod (although I often don’t, preferring to be able to move freely with my camera).

Food and travel go together -- but sometimes a longer lens is preferable - you wouldn't want to get too close to this clay pot cooking in Singapore - those pots are hot!! You can see some more pics and learn more about clay pot cooking by clicking here - Travel food pics & clay pot cooking


Take photos for different angles and viewpoints. The overhead shot can be effective.  Make sure your salad is fresh made.

Natural light diffused by cloud


 Background - colours, patterns etc. Simple is better. Are you going to photograph on your kitchen bench or include the whole story of the food. It depends on the feel you want to convey. 
Collect a range of backdrops and table tops - ie old wooden boards make great table tops for a rustic, country feel. 


You can find some great items in salvage yards, your dad’s back shed, and second hand or antique stores.


Or go for something dramatic like a black shiny tile. 


Props - Tell the whole story by using props - if you are photographing a plate of food, you might want to include napkins, servers, cutlery, another plate of food in the background, cups or glasses (include the drink).


However don’t clutter the image or have your props overpower the food – remember simple styling is usually better. 
You could try putting yourself in the image - of course you will need a tripod and use the timer function on your camera.


  Make sure the decorations suit the style of food you are photographing - ie you might not want to photograph an upmarket classic dish in a wooden bowl. 

Although sometimes something a bit different makes for a great picture.


A bowl of cherries will look completely different photographed in an elegant dish than when photographed in a basket or wooden bowl. 

Notice the nice side lighting highlighting the cherries and the glass dish. 


 Simple white china is classic and can be used for a variety of dishes. 


Collect a variety of plates, bowls, napkins etc, hunt through your grandmother's china cabinet and cutlery drawer!


Practice makes perfect! Plan your photo shoot. Think about your props, composition and light.


Start simple by photographing fruit or vegetables etc – ie something that is not going to wilt in 10 minutes. 

Once you have mastered the basket of oranges you might want to make the cake. The bonus is that you get to eat it afterwards. 


My husband always knows when I have been photographing food, as he usually gets something different for dinner! 

This cake tastes as delicious as it looks - cooked by Denise from the Photography Group of Bunbury for the workshop - and photographed, tasted and enjoyed by everyone!  


Cooked food creates different issues. You must have your table, background etc set up and ready before you bring the cooked food into the picture. The fresh just-cooked look disappears in mere minutes. There are only so many times you can add more cheese and reheat a pizza!

 Check the small detail.  Take a range of pics and then download and check your images – amazing how a stray piece of lettuce you missed when you were taking the photo is glaringly obvious on the computer screen.
Why isn't the red wine "in" the glass?
 
My next project is to find out about “tethered shooting” where you can view your images on a computer screen as soon as you take them. 


 And lastly - experiment and have fun!
Cupcakes in Singapore
ps –I am not a pro food photographer, but I have been playing around with it for a couple of years. I know I still have lots to learn, particularly about studio lighting.  But I hope these few simple tips will help you. I am hoping one day someone will pay me to photograph food! 

 Browse through cook books or websites for inspiration. 
 
You can see some great work on Flickr food groups.

You could even check out my Flickr food page - go to page 4 when you get there to see my latest food pics -Jill's food pics on Flickr


There are lots of great food photography sites on the net. A couple of my favourite sites are - 


www.dariomilanophotography.com –  Dario is in Sydney Australia – and see Dario’s tips and critiques on Facebook - https://www.facebook.com/FoodPixels?hc_location=stream


My all-time favourite is Tartelette - www.tarteletteblog.com

Helene Dujardin is a French expat, lives in USA and has written a fabulous practical handbook for newbie food photographers – From Plate to Pixel. Helene started photographing food in her lounge room and now has a team of photographers working under her and runs food photography workshops.

Thankyou for stopping by to visit - I hope I have inspired you to look at food photography in a different way. I look forward to hearing from you. Have a wonderful week.

 I am linking up to Mosaic Monday, Our World Tuesday, Tuesday Around the World, Foodie Tuesday, and the "What's It Wednesday" party going on over at "Ivy and Elephants". Please click on the links to see fabulous contributions from around the world - virtual touring at its best!

Mosaic Monday
Our World Tuesday
Tuesday Around the World  
Foodie Tuesday 
What's It Wednesday


You might also enjoy - 
Lemons and Lemon Butter
Cumquats from tree to marmalade
Delighting in a bowl of cherries